(WebAPI)Microsoft Graph – Excel REST API (C Sharp) を使い Range を操作するサンプル コード
Last Update:
(※ 2017 年 1 月 23 日に Japan Office Developer Support Blog に公開した情報のアーカイブです。)
こんにちは、Office Developer サポートの森 健吾 (kenmori) です。
今回の投稿では、Microsoft Graph – Excel REST API を使用して、指定されたアドレスの Range オブジェクトを操作するプログラムを、実際に C# で開発するエクスペリエンスをご紹介します。
ウォークスルーのような形式にしておりますので、慣れていない方も今回の投稿を一通り実施することで、プログラム開発を経験し理解できると思います。前回の OneDrive API のウォークスルー同様、本投稿では、現実的な実装シナリオを重視するよりも、Excel REST API を理解するためになるべくシンプルなコードにすることを心掛けています。例外処理なども含めていませんので、実際にコーディングする際には、あくまでこのコードを参考する形でご検討ください。
Excel REST API は、OneDrive API が前提となります。OneDrive API エンドポイント配下で取得したファイルに対してのみ、Excel REST API は使用できます。Office 365 という前提はありますが、一度慣れてしまえばオートメーションの要件において、OpenXML などのプログラムを実装するよりも開発生産性が高いと思います。
事前準備
以前の投稿をもとに、Azure AD にアプリケーションの登録を完了してください。少なくとも以下の 2 つのデリゲートされたアクセス許可が必要です。
・Have full access to all files user can access ・Sign users in
using Newtonsoft.Json;
using System.Collections.Generic;

namespace ExcelAPITest
{
    public class MyFile
    {
        public string Name { get; set; }
    }

    public class MyFiles
    {
        public List<MyFile> Value;
    }

    public class WorkSheet
    {
        public string Name;
    }

    public class WorkSheets
    {
        public List<WorkSheet> Value;
    }

    public class Range
    {
        public List<List<string>> Values;
        public List<List<string>> Formulas;
    }
}
10. フォームのコードに移動します。 11. using を追記しておきます。
1
2
3
4
5
6
7
8
9
10
using Microsoft.IdentityModel.Clients.ActiveDirectory;
using Newtonsoft.Json;
using System;
using System.Collections.Generic;
using System.Net.Http;
using System.Net.Http.Headers;
using System.Text;
using System.Threading.Tasks;
using System.Windows.Forms;
using ExcelAPITest; //9. で作成した MyFile.cs 内の名前空間
12. フォームのメンバー変数に以下を加えます。 ※ clientid や redirecturi は Azure AD で事前に登録したものを使用ください。
using (HttpClient httpClient = new HttpClient()) { httpClient.DefaultRequestHeaders.Authorization = new AuthenticationHeaderValue("Bearer", AccessToken);
HttpRequestMessage request = new HttpRequestMessage( HttpMethod.Get, new Uri(string.Format("https://graph.microsoft.com/v1.0/me/drive/root:/{0}:/workbook/worksheets", fileLeafRef)) );
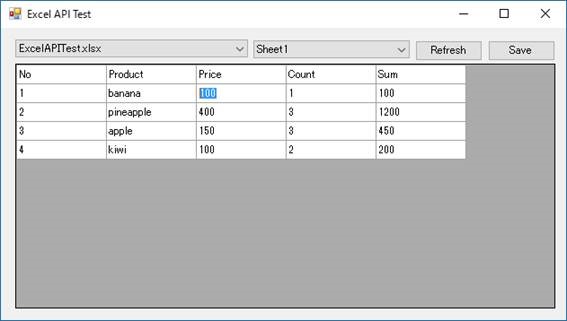
using (HttpClient httpClient = new HttpClient()) { httpClient.DefaultRequestHeaders.Authorization = new AuthenticationHeaderValue("Bearer", AccessToken); HttpRequestMessage request = new HttpRequestMessage( new HttpMethod("PATCH"), new Uri(string.Format("https://graph.microsoft.com/v1.0/me/drive/root:/{0}:/workbook/worksheets(%27{1}%27)/range(address=%27{1}!A1:E5%27)", fileLeafRef, WorkSheetName)) ); range = GetRangeData(); request.Content = new StringContent(JsonConvert.SerializeObject(range), Encoding.UTF8, "application/json"); var response = await httpClient.SendAsync(request); MessageBox.Show(response.StatusCode.ToString()); } }
private Range GetRangeData() { int rowIndex = 0; Range temprange = new Range(); List<List<string>> formulas = new List<List<string>>(); List<List<string>> values = new List<List<string>>(); foreach (DataGridViewRow Row in rangeGV.Rows) { List<string> formulasInRow = new List<string>(); List<string> valuesInRow = new List<string>(); for (int j = 0; j < rangeGV.Columns.Count; j++) { string CellData = (Row.Cells[j].Value == null) ? "" : Row.Cells[j].Value.ToString(); valuesInRow.Add(CellData); if (Row.Cells[j].ReadOnly) { formulasInRow.Add(range.Formulas[rowIndex][j]); } else { formulasInRow.Add(CellData); } } formulas.Add(formulasInRow); values.Add(valuesInRow); rowIndex++; } temprange.Values = values; temprange.Formulas = formulas; return temprange; }